This article looks at how to write test cases in Jira. The tutorial will walk you through configuring Jira to handle test cases and their results and to view lists of both cases and runs filtered by release. We’ll also look at some of the advantages and disadvantages of using Jira as a test case management tool.

Test cases are a fundamental part of the software testing process. They effectively answer the “what” and “how” of testing. That being said, what needs to be tested? And how exactly does the test need to be performed? Writing them takes time, but test cases can be extremely valuable artifacts if done well. Once test cases are written, store them where they can be easily located, referenced, and updated in good time.
What is Jira?
Jira is a top-rated tool used by software development teams for tracking bugs, new feature requests, and tasks. Its customizable nature allows for a broad set of use cases when managing software development projects. Jira is great for handling high volume backlogs and bringing teams together to focus on the work that matters. The most common way software testing teams use Jira is to log bugs and new features.
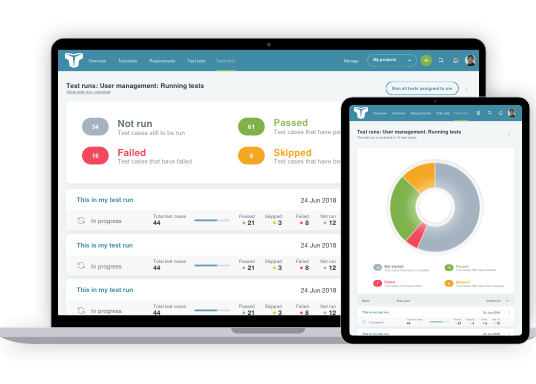
Jira can also function as a test case management tool, but because it has not been specifically designed for this role, several time-intensive configurations need to be made to make it operable. For this reason, an increasing number of users are choosing to integrate Jira with a reliable, purpose-built test case management tool, such as TestLodge. The integration gives them access to the twin resources, letting them get on with the actual job of testing far quicker than by using Jira alone.
However, for those who would prefer to use Jira as a stand-alone tool, our highly detailed step-by-step guide shows you how to configure it to allow you to write and manage test cases directly in Jira itself. Let’s take a look at how to write test cases in Jira.
Writing Test Cases in Jira
Jira is a powerful tool with many configuration options. It’s great for customizing workflows to fit various use cases, but it can be intimidating to wrangle all of these features to get things set up the way you need and want them to be.
But don’t worry, we’re here to help! Here is your guide for writing test cases in Jira.
In this tutorial, we will be using the Jira ‘Issue’ content type to store our test cases and then ‘sub-tasks’ to store our results.

Jira Initial Setup
Firstly, you will need to look at projects and users, then make sure you have the correct settings for completing the rest of this tutorial.
Step 1: Your user
To complete this tutorial, you need to be logged in as a user with global administrator permissions. This is essential because you need high-level access to configure Jira screens, schemas, and custom fields.
You can check that you have this role by navigating to ‘Settings’ > ‘User Management’ > ‘Users.’
Step 2: Creating Projects
Next, you need to create a project which is where you will write your test cases.
To make a Project, go to the ‘Home’ screen and select ‘Projects’ > ‘Create Project.’
Form field values:
- Project name: ‘Product A’ (This can be called whatever you wish, but for the purposes of this tutorial, we are using ‘Product A’ as our project name)
- Template: ‘Bug tracking’ (Make sure you select the ‘Bug tracking’ template (also known as the ‘Basic software development’ template), rather than the default one, which might be pre-selected.)
Now that you have the correct user permissions and project setup, it’s time to start configuring Jira to fit your needs.
Configuring Jira to Handle Test Cases
Here we will look at configuring Jira to be able to handle test cases with the relevant forms and fields, and at the end, you will be able to add test cases in the same way that you add issues.
Step 1: Custom Issue Type
As you will be creating your test cases as issues, you need to add a new issue type to your Jira account.
1. Under the main menu, navigate to ‘Settings’ > ‘Issues’ > Issue Types.
2. Click ‘Add issue type and create a new type using the following values:
Form field values:
- Name: ‘Test Case Screen’
- Type: ‘Standard Issue Type’

Step 2: Custom Fields
Adding custom fields will allow you to define what details you would like your test cases to contain.
1. Under the main menu, navigate to ‘Settings’ > ‘Issues’ > ‘Custom Fields.’
2. Click ‘Add custom field,’ and for each field, you choose to add, you will be provided with the option to select what data type it should be, followed by giving it a name.
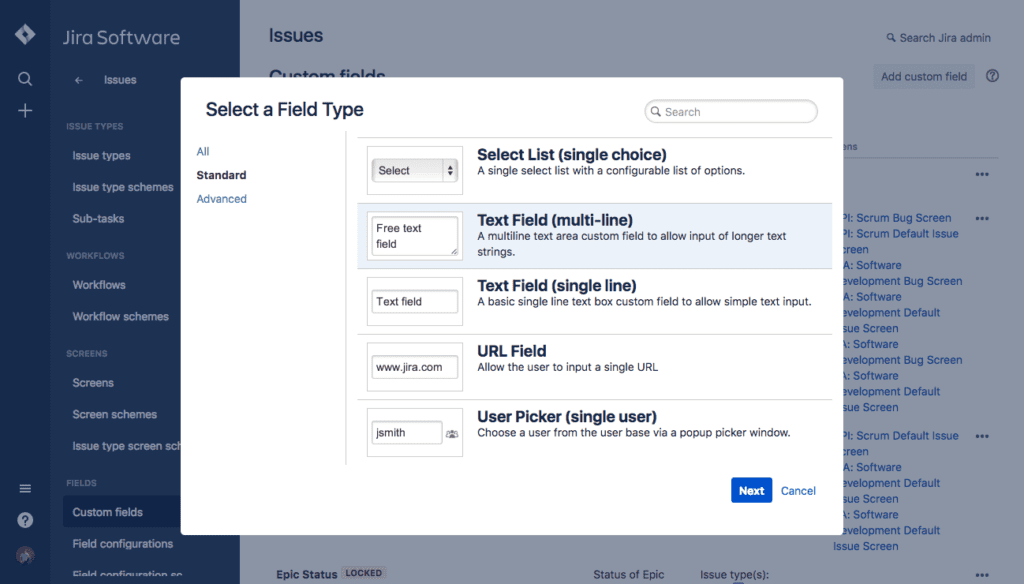
Choose to create the following two custom fields.
- Name: ‘Test Case Steps.’ Field Type: Text field, Multi-line.
- Name: ‘Test Case Expected Results,’ Field Type: Text field, Multi-line.
Note: Don’t assign these to any screens at present because you will do this later.
Step 3: Custom Screen
Now, you will want to create a custom screen to which you will add these fields.
1. Under the main menu, navigate to ‘Settings’ > ‘Issues’ > ‘Screens.’
2. Click ‘Add screen’ and create a new screen using the following values:
Form field values:
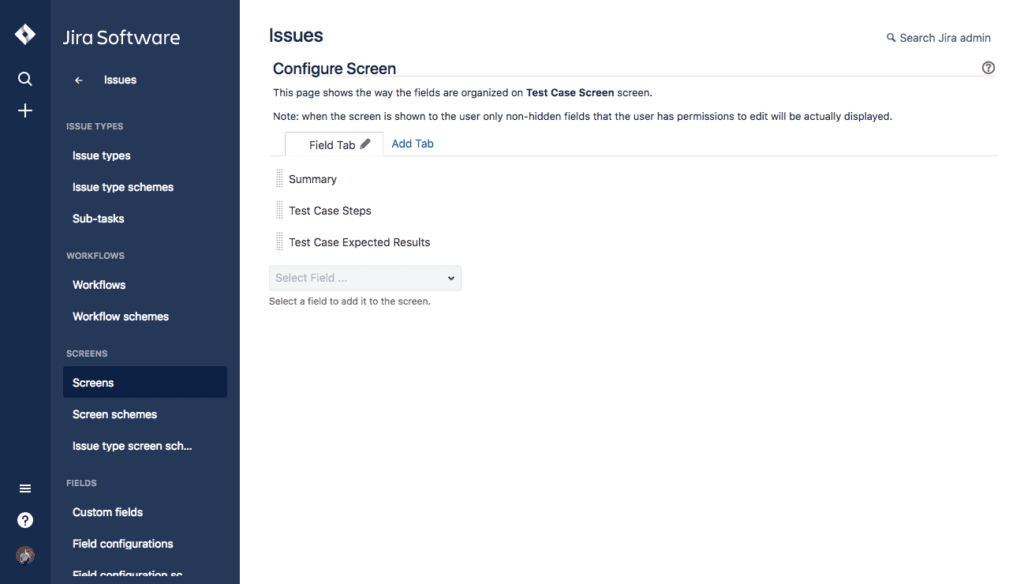
- Name: ‘Test Case Screen’
3. Once created, you will be taken to a page that allows you to add fields to this new screen. Using the drop-down menu, add the following three fields, ‘Summary,’ ‘Test Case Steps’ and ‘Test Case Expected Results’ as shown in the image below.
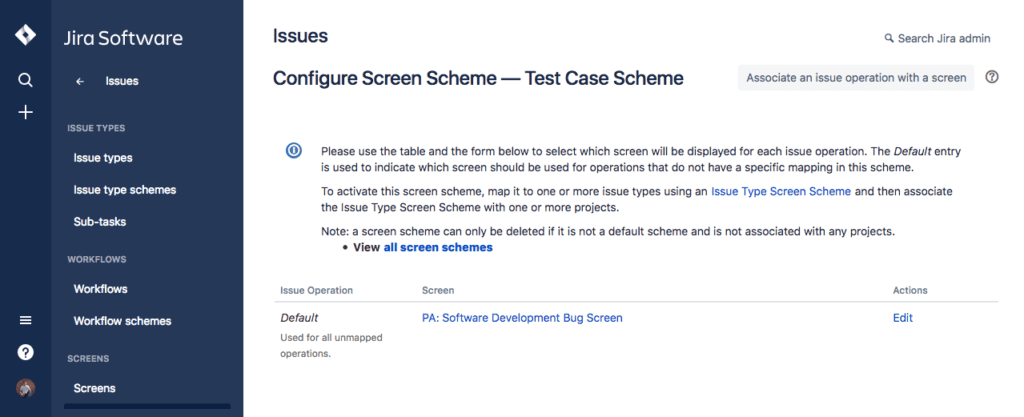
Step 4: Screen Schema
Now it’s time to create a screen schema and associate it with the screen you created in step 3.
1. Under the main menu, navigate to ‘Settings’ > ‘Issues’ > ‘Screen schemes.’
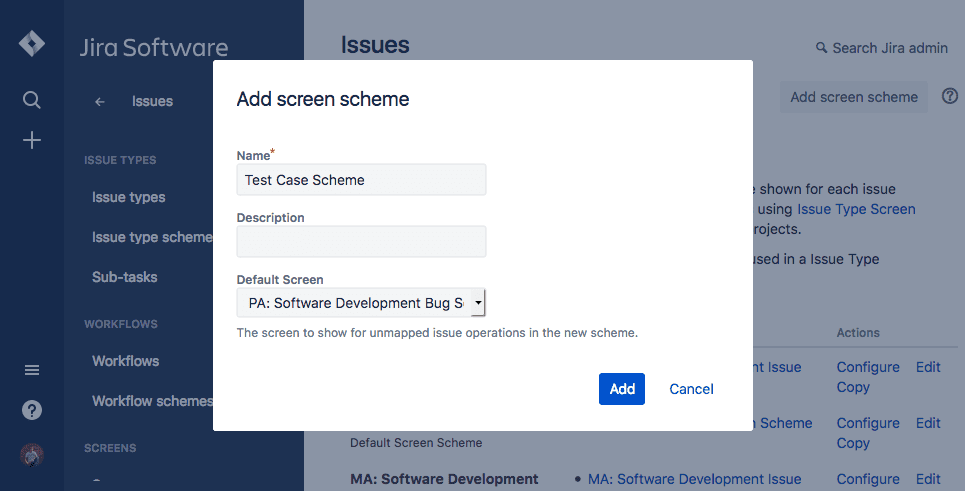
2. Click ‘Add screen scheme’ and create a new schema using the following values:
Form field values:
- Name: ‘Test Case Scheme’
- Screen Scheme: ‘PA: Software Development Bug Screen’ (or whichever project you are using).
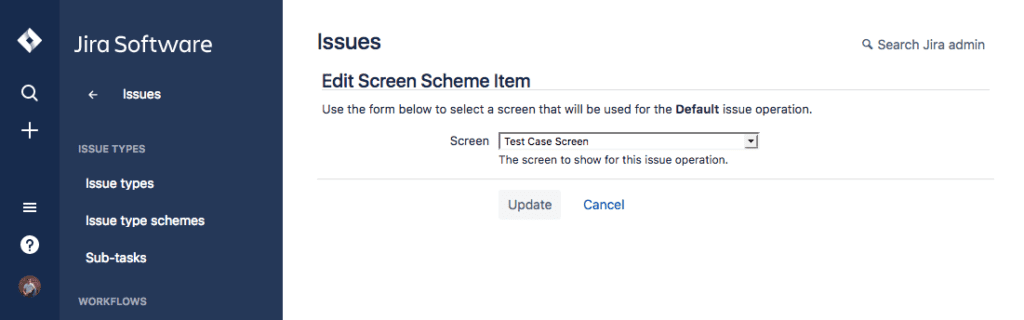
3. Once created, you will be presented with the following screen. Choose the ‘Edit’ option for the default issue operation listed.
4. Set the form options as shown below and click ‘Update’ to save your changes.
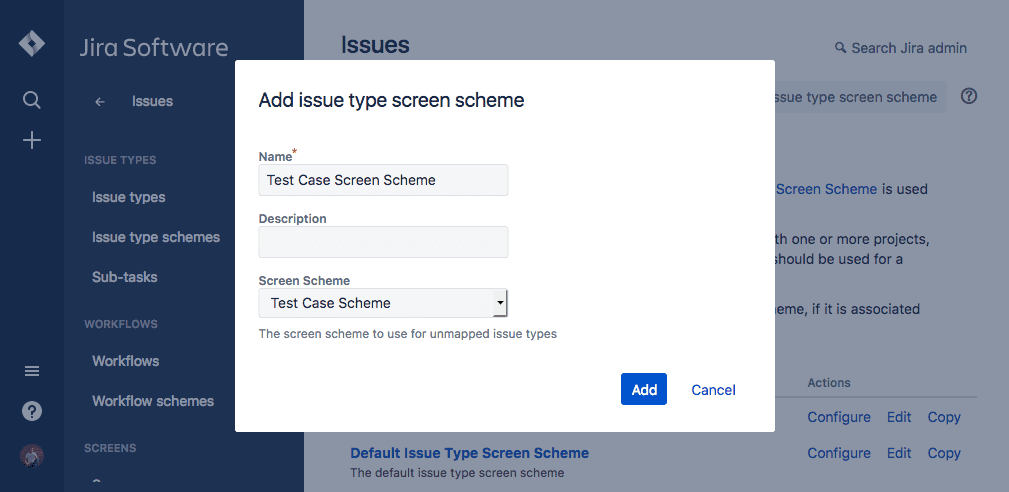
Step 5: Issue Type Screen Schema
Now you will need to create a screen schema.
1. Under the main menu, navigate to ‘Settings’ > ‘Issues’ > ‘Issue type screen schema.’
2. Click ‘Add issue type screen scheme’ and create a new schema using the following values:
Form field values:
- Name: ‘Test Case Screen Scheme’
- Screen Scheme: ‘Test Case Scheme’
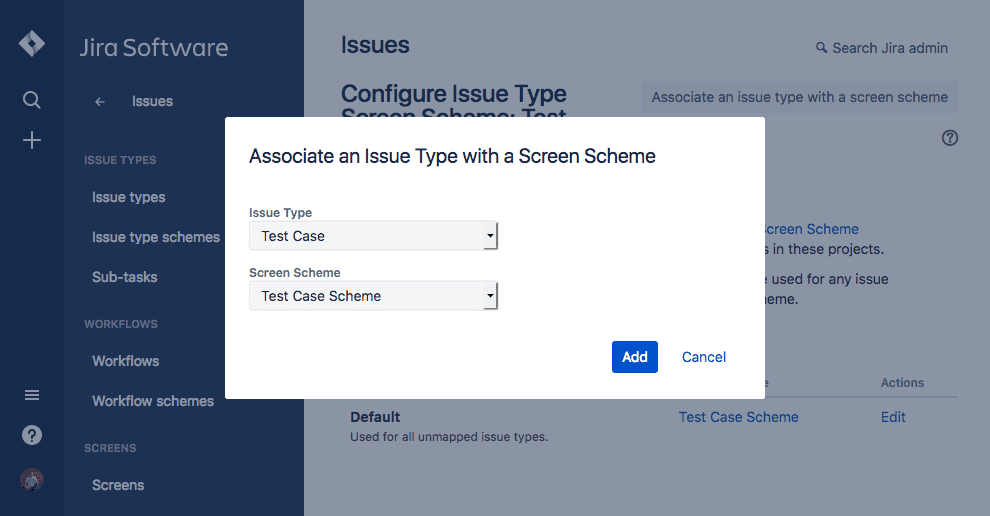
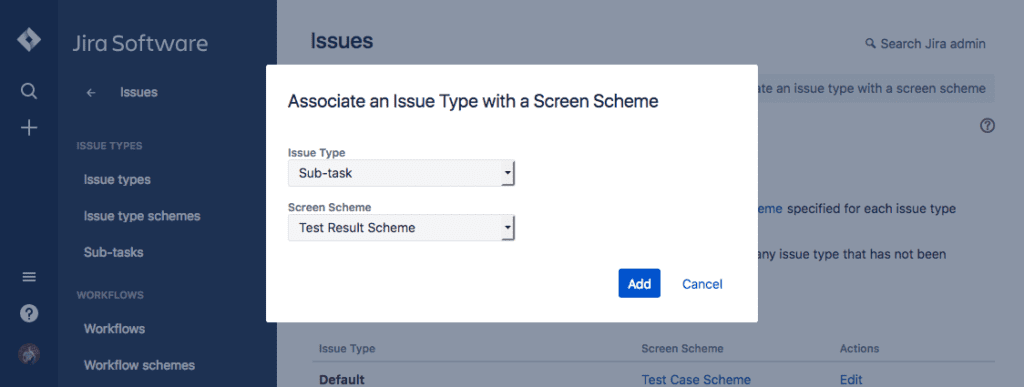
3. Now this has been created, you need to configure it for the specific custom issue type you created in step 1. You should already be on the relevant page shown in the following image, but if not, under the menu, navigate to ‘Settings’ > ‘Issues’ > ‘Issue type screen schemes’ and click on ‘Configure’ next to the schema that you have created.
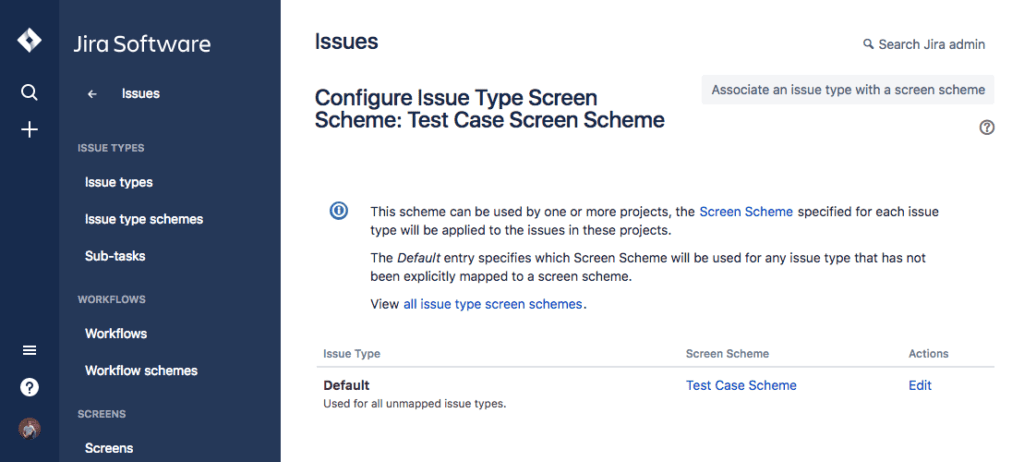
- Click ‘Associate an issue type with a screen scheme’ and create an entry using the following values:
Form field values:
- Issue Type: ‘Test Case’
- Screen Scheme: ‘Test Case Scheme’
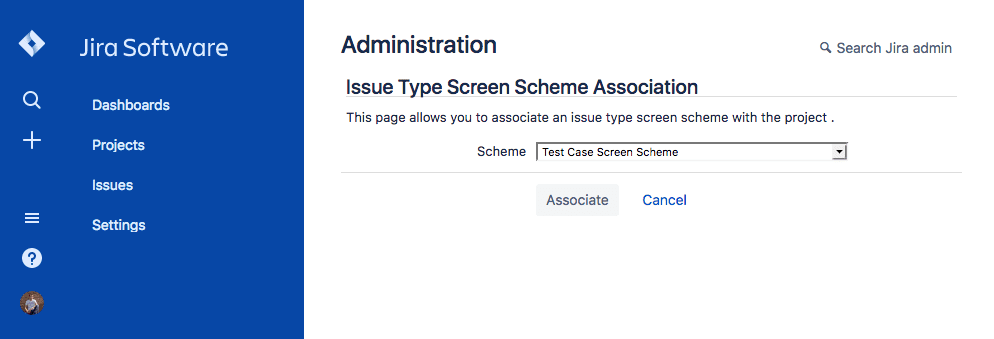
Step 6: Associating the Configuration to Your Jira Project
You will now need to update the screen scheme that your project uses
1. Choose to view the main overview page of the project where you have chosen to create your cases.
2. Navigate to the project ‘Settings’ and select ‘Screens.’
3. In the top right, click the ‘Actions’ button and select ‘Use a different scheme’ from the drop-down menu.
4. Choose the form options as follows and click ‘Associate’ to save your changes.
Form field values:
- Scheme: ‘Test Case Screen Scheme’
Step 7: Add the Test Case Issue Type
1. Under the main menu, navigate to ‘Settings’ > ‘Issues’ > ‘Issue type schemes.’ (This is back in the global settings and not the project settings.)
2. Click the ‘Edit’ link next to the project you will use.
3. Drag the ‘Test’ case issue type across from the ‘Available Issue Types’ box to the ‘Current Scheme’ box and then save your changes.
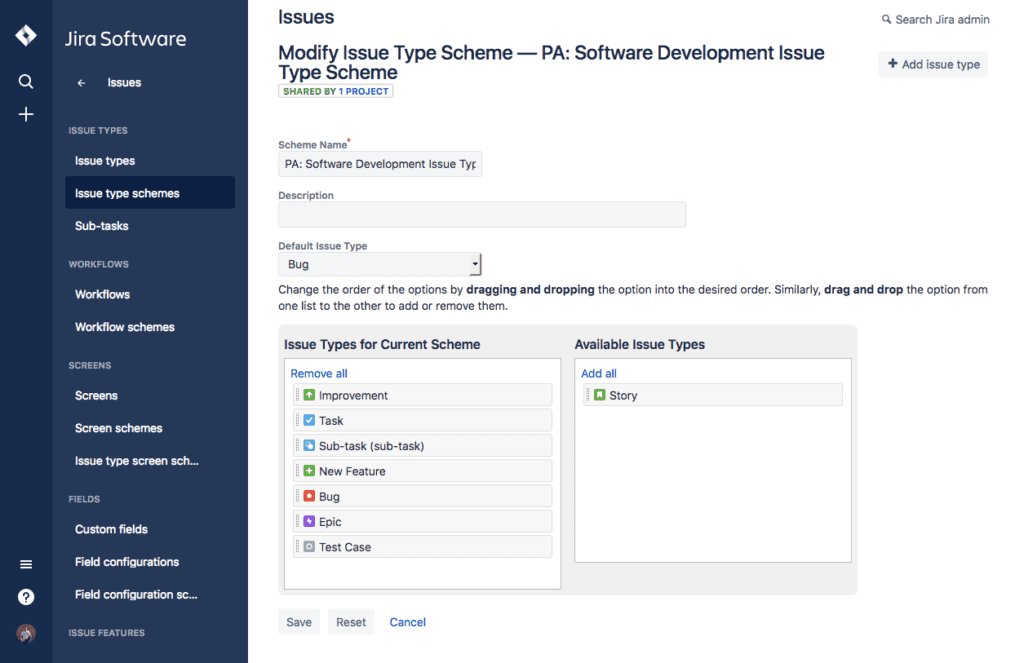
4. Optionally, you may also choose to remove some types which you don’t feel are needed. If you do this, make sure you do not remove the ‘sub-task’ type, as you will configure this in the next section to record results against your test case.
At the very minimum, you should have both ‘Test Case’ and ‘Sub-task’ types still available for this project.
Step 8: Create a few test cases
The configuration to allow Jira to handle test cases is complete.
If you view your project and choose to create an issue of the type ‘Test Case’, you should be presented with the following form.
The summary field is required in Jira, so we recommend using it to give the test case a title and a test case reference number, too, if required.
Before moving on, go ahead and create yourself a few test cases.
Configuring Jira to Accept Test Results for Your Cases
Now that you can create test cases, you will want to execute them and assign a result of either pass, fail or skip.
Although you could just add a comment to each case, we recommend using sub-tasks to do this as it will allow you to add multiple results and view them all in one list.
This does require a small bit of configuration in Jira to be completed.
Step 1: Custom Issue Type
Firstly you need to create a custom field to record the results.
1. Under the main menu, navigate to ‘Settings’ > ‘Issues’ > ‘Custom Fields.’
2. Click ‘Add custom field’ and choose to add the following two fields:
- Name: ‘Test Case Result, Field Type: Radio Button, Field Options: Pass, Fail, Skip
- Name: ‘Test Case Actual Results,’ Field Type: Text field, Multiline
Note: Don’t assign these to any screens at present, as you will do this later on.
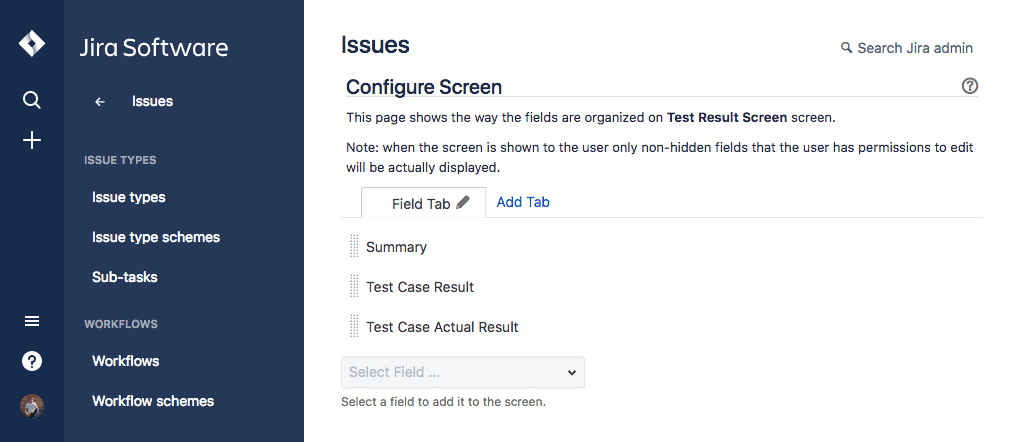
Step 2: Create a Screen for the Result
You will now need to create a new screen for the test case result that you will designate as a sub-task.
1. Under the main menu, navigate to ‘Settings’ > ‘Issues’ > ‘Screens.’
2. Click ‘Add Screen’ and create an entry using the following value:
Form field values:
- Name: ‘Test Result Screen
3. Once created, you should now add the following three fields to your new screen: ‘Summary,’ ‘Test Case Result,’ ‘Test Case Actual Result.’
Step 3: Create a Screen Schema for the Result
As before, you now need to create a screen schema for the result.
1. Under the main menu, navigate to ‘Settings’ > ‘Issues’ > ‘Screen schemes.’
2. Choose ‘Add screen scheme’ and create an entry with the following values:
Form field values:
- Name: ‘Test Result Scheme’
- Default Screen: ‘Test Result Screen’
Step 4: Configure the Issue Type Screen Scheme
As a final configuration step, you just need to link the new scheme to a Jira sub-task.
1. Under the main menu, navigate to ‘Settings’ > ‘Issues’ > ‘Issue Type Screen Schemes.’
2. Click ‘Configure next to’ the existing scheme you have already created, named ‘Test Case Screen Scheme.’
3. Click ‘Associate an issue type with a screen scheme’ and create an entry using the following values:
Form field values:
- Issue Type: ‘Sub-task’
- Default Screen: ‘Test Result Scheme’
Step 5: Add a Test Case Result
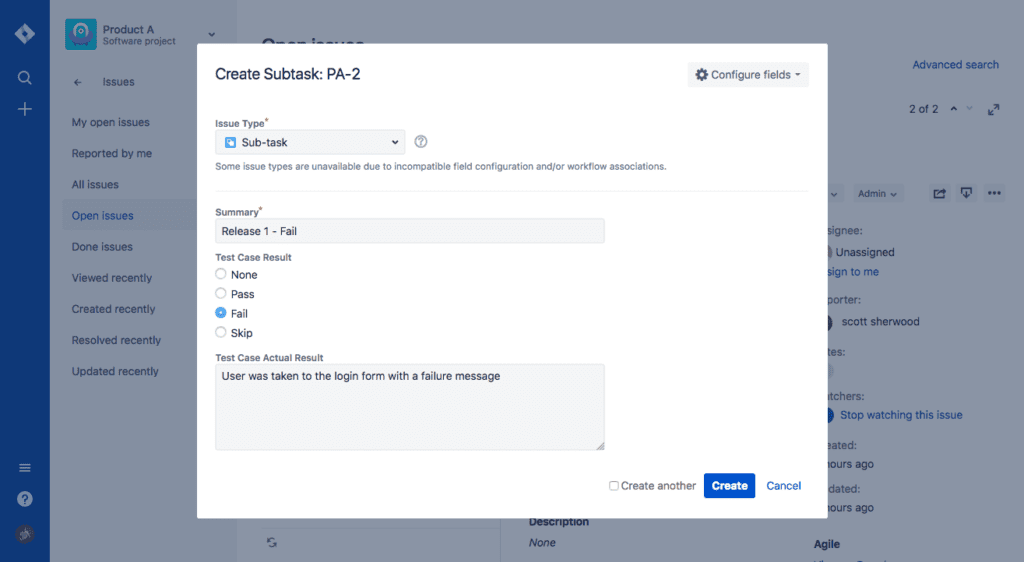
That’s all the configuration completed. You are now set up to add results to your cases, which can be done as follows:
1. View one of your existing test cases and select the drop-down menu.
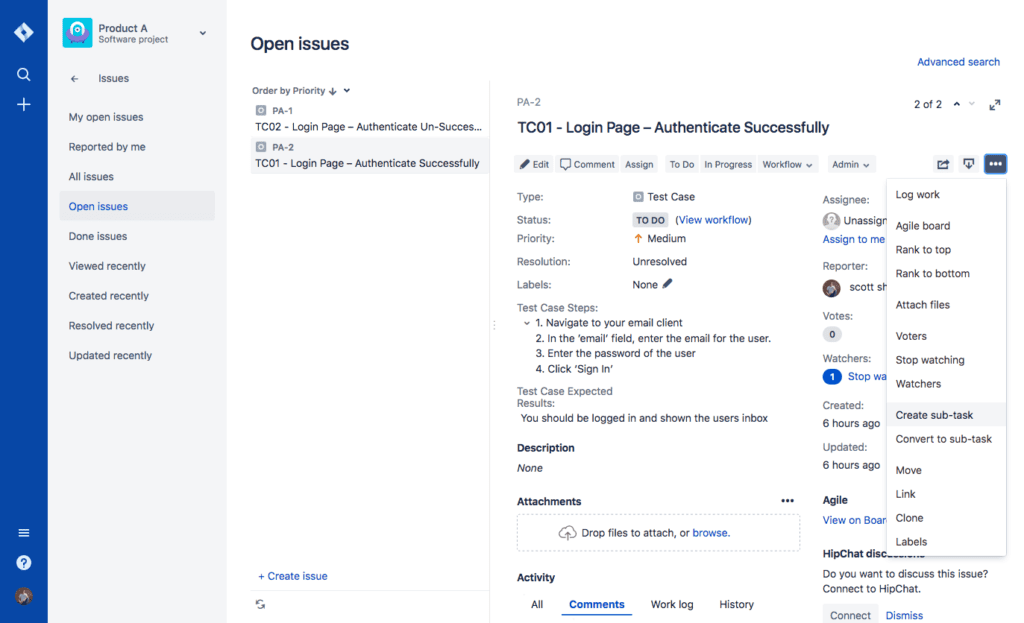
2. Click ‘Create sub-task.’
3. You can now enter a result. It is suggested that you use the following fields:
- Summary – Reference either a date, release number, or test run name along with the result so you can filter all your results later.
- Test case result – Use the radio buttons to mark the test case as passed, failed, or skipped.
- Test case actual result – If the actual result differs from the expected, use this box to provide further information.
Test Case Reporting
Reporting is not straightforward because Jira has not been specifically designed to be a test management tool, but here are a few tips to help you to view all your test cases and results in a list.
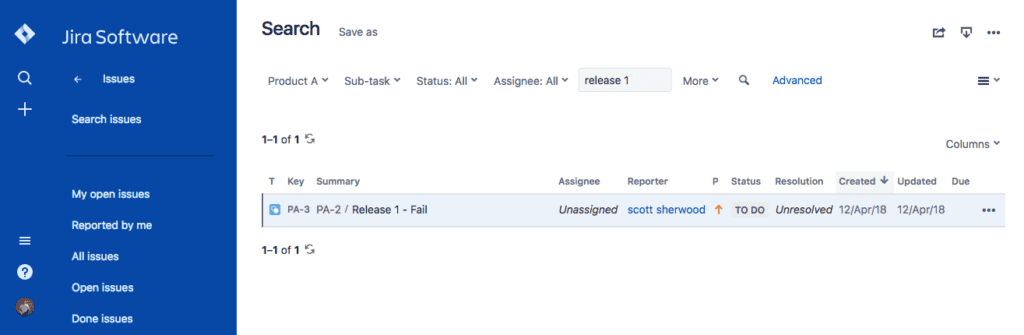
1. Selecting the ‘All issues’ option in the navigation will allow you to view everything together.
2. From here, you may want to switch to the ‘List view’ using one of the options found towards the top of the page.
3. To view just your test cases, choose the ‘Type’ filter, and then filter by ‘Test Case.’
4. Similarly, if you wish to only view results, filter the type by ‘sub-task.’
5. Using the free text search field, you could then filter your search further. For example, if you named your test results in order of release as recommended, you could then filter by release number.
Problems with Writing Test Cases in Jira
As you can see, test cases can be written in Jira, but it requires a lot of customization work (as illustrated in the steps above). If you don’t have experience as a Jira administrator, you will need to set aside several hours to configure Jira to work for test case management.
Even then, because Jira was not specifically built for test case management, it lacks several features and reporting facilities specific to testing. The main problems with writing test cases in Jira are:
- Configuration Time – Jira has not been designed to be a test management tool, so the time it takes to customize the tool to allow you to enter test cases takes a while, as we have found out.
- Low productivity – Entering test cases and then entering results is not a quick task, and you will have to navigate a series of screens that have not been designed with this specific usage in mind.
- Reporting – Reporting on your test cases is limited to basic lists. For example, Jira will not track how many times a test has been run or how many times a test has failed in the past. So, if you’re looking for a more straightforward, intuitive, and scalable solution out of the box, you will want to seek out a dedicated, stand-alone test case management platform.
Dedicated Test Case Management Tool with Jira Integration
A genuine, dedicated test case management tool will come ready, out of the box, with little to no customization work required. With something like TestLodge, you can start writing test cases minutes after signing up, instead of spending hours working on custom configurations.
Maybe you’re concerned about working in two different systems, or you like the idea of using Jira for testing because that’s where you log bugs anyway. With TestLodge’s native Jira integration, failed tests can be automatically sent into Jira as bugs, then the issue status synced back. This simple integration can be configured in minutes, and it helps close the loop between the testing team and the development team.
By using a stand-alone test case management tool like TestLodge, your testing team can remain focused on testing, and your development team can continue fixing bugs uninterrupted. You will find further information on how this can be seamlessly achieved on our Jira test management page.
About the writer

Scott Sherwood
Scott Sherwood is the Founder and Director of TestLodge, which he built after noticing a lack of straightforward, easy to use test management tools available online.
All Scott Sherwood's articles